 $25 OFF AC REPAIR | $139 MAINTENANCE


SERVICING: CALGARY & THE CMR
LENNOX FURNACE & AC REPAIR
Are you looking for reliable Lennox furnace and air conditioner repair or installation services in Calgary? One Stop HVAC offers same-day repair services for all Lennox products. Call us today to schedule your appointment!

Service Availability
7 Days a Week

Top Rated
On Google

Licensed
Techs & Gasfitters

Served Hundreds Of
Local Residents

Great Prices
Always!

Get Your Free
Estimate Today
LENNOX HVAC SERVICES
Please Select One Of The Following:


Emergency Lennox Furnace Repair
As the temperature drops and winter approaches, the last thing you want is a malfunctioning furnace. A cold and uncomfortable home doesn’t have to be your fate. Our top-rated Lennox furnace repair and installation services are here to provide fast and efficient solutions for all your furnace needs in Alberta.
At One Stop HVAC, we pride ourselves on delivering exceptional service and quality workmanship. Whether you need a routine maintenance check, a repair, or a new Lennox furnace installation, our team of experts is here to help. We understand the importance of a warm and cozy home during the winter months, and we’re committed to ensuring that you have a reliable furnace that you can count on.
Why won't my Lennox furnace turn on?
Possible causes for your Lennox furnace not turning on:
Power Supply: Verify that the furnace is receiving electricity. Ensure the power supply is intact.
Thermostat Settings: Check the thermostat settings to ensure they are configured correctly. Replace the batteries if necessary.
Ignition System: If the problem persists, there might be an issue with the ignition system. Consider reaching out to a professional technician for a thorough inspection.
Control Board: A malfunctioning control board could also be the culprit. Professional assistance is recommended for further diagnosis and repair.
If you encounter any challenges, our expert technicians at One Stop HVAC are ready to assist you. Please contact us for prompt and reliable service.
Why is my Lennox furnace blowing cold air?
Troubleshooting Steps:
- Thermostat Settings: Confirm that the thermostat is set to the “Heat” mode and adjusted to your desired temperature.
- Air Filters: Check the air filters for any clogs. Replace them if needed, as restricted airflow can affect heating efficiency.
- Gas Supply: Ensure there are no issues with the gas supply. If you suspect a problem, contact your gas provider for assistance.
- Flame Sensor: A malfunctioning flame sensor could be a potential cause. Consider reaching out to a certified technician for a thorough inspection.
- Blower Motor: Problems with the blower motor might result in cold air. Professional assistance is recommended for diagnosing and resolving issues with the blower motor.
If you require further assistance, our certified technicians at One Stop HVAC are available to help. Feel free to reach out for prompt and reliable service.
Is it normal for my Lennox furnace to make loud noises during operation?
No, unusual noises are typically signs of underlying issues.
Possible Causes:
- Loose Blower Motor: Check if the blower motor is securely in place. A loose motor can create disruptive sounds during operation.
- Damaged Belts: Inspect for damaged or loose belts, as they can contribute to loud noises. Replace or tighten as necessary.
- Worn-Out Bearings: Worn bearings in the furnace’s components can cause persistent noises. Professional attention is advised for bearing inspection and replacement.
Note: Ignoring these noises may lead to more significant problems and potential breakdowns.
For a thorough inspection and resolution of the noise issue, it is recommended to contact a professional HVAC technician. Our team at One Stop HVAC is ready to assist you!
How can I improve the weak airflow from my Lennox furnace?
Possible Solutions:
- Air Filter Inspection: Check the air filter for any clogs. A dirty or clogged filter can restrict airflow. Replace the filter if needed.
- Thermostat Examination: Ensure the thermostat is functioning correctly. Incorrect settings or a faulty thermostat can impact airflow. Verify and adjust settings as necessary.
- Flame Sensor Check: A malfunctioning flame sensor can contribute to weak airflow. Have a professional technician inspect and, if necessary, replace the flame sensor.
- Evaluate Furnace Size: If your furnace is oversized for your home’s heating needs, it may lead to short cycling and reduced airflow. A professional assessment can determine if resizing is necessary.
Note: Short cycling can result from various issues and may require a professional diagnosis for an accurate solution.
For a comprehensive evaluation and tailored recommendations, contact our experienced technicians at One Stop HVAC.
Can I perform regular maintenance on my Lennox furnace to prevent major problems?
Yes, regular maintenance is crucial for optimal performance.
DIY Maintenance Tips:
- Air Filter Replacement: Regularly replace air filters to prevent airflow restrictions and maintain system efficiency.
- Cleaning: Keep the furnace and surrounding area clean from dust and debris. Ensure proper ventilation for optimal operation.
- Visual Inspection: Check for visible issues, such as loose wires or components, and address them promptly.
Professional Maintenance:
While DIY maintenance is beneficial, it’s essential to schedule professional maintenance annually. Professional technicians can:
- Thorough Inspection: Conduct a comprehensive examination of all furnace components.
- Tune-Up: Perform necessary adjustments to ensure peak efficiency.
- Identify Potential Issues: Detect and address potential problems before they escalate.
Regular professional maintenance not only extends the lifespan of your Lennox furnace but also ensures it operates safely and efficiently. Contact One Stop HVAC to schedule your annual maintenance and keep your furnace in top condition.
Specialized Lennox AC Repair & Installation Services
When the scorching Canadian summers hit, having a functioning air conditioning unit is crucial to maintaining a comfortable indoor environment. Whether you need a new Lennox AC installed or your existing Lennox AC unit repaired, One Stop HVAC can provide customized solutions that prioritize you.
Proactive maintenance and timely repairs are essential for ensuring optimal performance and prolonging the lifespan of your Lennox AC unit. Neglecting minor issues can result in major problems, causing inconvenience, discomfort, and potentially expensive repairs.
Why is my Lennox AC not providing adequate cooling throughout my home?
Possible Causes and Solutions:
- Dirty Air Filter: Check and replace the air filter regularly. A dirty filter can restrict airflow and reduce cooling efficiency.
- Blocked Vents: Ensure all vents are open and unobstructed. Blocked vents can impede the airflow and impact cooling performance.
- Aging AC Unit: If your AC unit is old, it may struggle to cool effectively. Consider consulting with a professional technician to evaluate the system’s overall condition.
- Refrigerant Issues: Low refrigerant levels or refrigerant leaks can lead to inadequate cooling. A certified technician can diagnose and address refrigerant-related issues.
- Compressor Problems: A malfunctioning compressor can hinder the cooling process. Professional assistance is recommended for compressor inspection and repair.
Note: While simple maintenance tasks can enhance performance, persistent cooling issues may require a professional technician for a thorough diagnosis and resolution.
If you are experiencing ongoing cooling problems, our expert technicians at One Stop HVAC are ready to assist. Contact us for a comprehensive evaluation and effective solutions to restore your Lennox AC’s cooling efficiency.
Is it normal for my Lennox air conditioner to leak water?
Possible Causes and Solutions:
- Normal Condensation: A small amount of water around the AC unit is normal due to condensation. However, excessive leakage is not.
- Clogged Condensate Drain: Check the condensate drain for clogs. A blocked drain can lead to water overflow. Clean the drain if necessary.
- Broken Condensate Pump: A malfunctioning condensate pump may fail to remove water efficiently. Consult a professional technician for pump inspection and replacement if needed.
- Frozen Evaporator Coils: Frozen coils can cause excess water when thawing. Ensure proper airflow and address any refrigerant issues. Professional assistance may be required for coil inspection and repair.
Note: Persistent water leakage should be addressed promptly to prevent water damage and further complications.
If you need professional assistance in diagnosing and resolving the water leakage issue with your Lennox AC, our expert technicians at One Stop HVAC are ready to provide efficient and reliable solutions. Contact us for a thorough examination and effective repairs.
Why does my Lennox AC give off a bad smell when running?
Possible Causes and Actions:
- Mould or Mildew Growth: Musty or unpleasant odours may indicate mould or mildew within the AC unit or ductwork. Consider professional cleaning and disinfection to eliminate the source.
- Burnt Wire or Overheated Component: A burning smell could be a result of a burnt wire or overheated component. Turn off the AC immediately and contact a technician for inspection and necessary repairs.
Note: It’s crucial to address odours promptly to ensure indoor air quality and prevent potential safety hazards.
If you are experiencing foul odours from your Lennox AC, our skilled technicians at One Stop HVAC can conduct a thorough inspection, identify the source of the smell, and implement the necessary cleaning or repairs. Contact us for reliable service to restore a fresh and comfortable environment in your home.
Why is my Lennox AC making strange noises during operation?
Possible Causes and Actions:
- Rattling Noises: Rattling sounds may be indicative of loose components. Check for loose screws or panels. If the issue persists, turn off the AC and seek professional assistance to prevent further damage.
- Grinding Sounds: Grinding noises could signal issues with the fan motor or blower assembly. Turn off the AC immediately to prevent further damage, and contact a professional technician for inspection and repairs.
Note: Unusual noises should be addressed promptly to prevent potential damage and ensure the efficient operation of your Lennox AC.
If you are hearing strange noises from your AC unit, our experienced technicians at One Stop HVAC are ready to conduct a thorough inspection, identify the source of the problem, and implement the necessary repairs. Contact us for swift and reliable service to restore the quiet and effective operation of your Lennox AC.
Why is my Lennox AC not turning on?
Possible Causes and Troubleshooting Steps:
- Thermostat Settings: Ensure the thermostat is set correctly for cooling, and replace the batteries if necessary.
- Circuit Breaker or Fuse: Check the circuit breaker or fuse for the AC unit. If tripped or blown, reset the breaker or replace the fuse.
- Capacitor Issues: A malfunctioning capacitor can prevent the AC from starting. Professional assistance is recommended for capacitor inspection and replacement.
- Compressor Problems: Issues with the compressor may hinder the AC’s ability to turn on. A professional technician can diagnose and address compressor-related issues.
- Electrical Connections: Loose or faulty electrical connections can disrupt the AC’s operation. Professional inspection and repair are advised.
Note: If basic troubleshooting does not resolve the issue, it’s best to contact a professional technician for a thorough diagnosis and necessary repairs.
If your Lennox AC is still not turning on, our skilled technicians at One Stop HVAC are ready to provide expert assistance. Contact us for prompt and reliable service.
Heat Pumps, Thermostats and More
Lennox Heat Pump Repair & Installation
Lennox heat pumps combine both heating and cooling abilities into one appliance, offering all year-round comfort! These appliances are excellent additions to Canadian properties, however, if your heat pump breaks down then you are left with no HVAC system at all. This is why One Stop HVAC offers emergency Lennox heat pump repairs and same-day appointments for Lennox heat pump installations. We are your new trusted partner, ensuring your home is never left without a functioning HVAC system.
Why won't my Lennox heat pump turn on?
Possible Causes and Troubleshooting Steps:
- Thermostat Settings: Check if the thermostat is set correctly for the heat pump operation. Incorrect settings can prevent the unit from turning on.
- Power Failure: Verify the power supply to the unit. Ensure there are no issues with the power connection, and check for any power failures affecting the heat pump.
- Blown Fuse: Inspect the circuit breaker for a blown fuse. If found, reset the circuit breaker to address the issue.
- Faulty Wiring: Faulty wiring in the unit can disrupt its operation. Professional assistance is necessary for inspecting and servicing the equipment.
Note: If troubleshooting steps do not resolve the problem, it’s recommended to contact a professional technician for a thorough diagnosis and necessary repairs.
If your Lennox heat pump is still not turning on, our experienced technicians at One Stop HVAC are available to provide expert assistance. Contact us for reliable service to restore the functionality of your Lennox heat pump.
Why is my Lennox heat pump not heating or cooling?
Possible Causes and Solutions:
- Dirty or Blocked Fins: Dirty fins can hinder the heat pump’s ability to cool effectively. Regular maintenance, including cleaning the fins, is crucial for optimal performance.
- Dirty Air Filter: A dirty air filter can restrict airflow, affecting the heat pump’s ability to cool or heat. Change the air filter regularly to ensure proper air circulation.
- Dirty Interior: Accumulated debris inside the heat pump can create blockages, impeding its heating or cooling function. Carefully clean the interior to remove any obstructions.
- Restricted Ductwork: If there’s a restriction in the ductwork, it can hinder the flow of cool or hot air. Inspect and clear any obstructions in the ductwork to allow proper airflow.
Note: Regular maintenance is essential to prevent issues and ensure the efficient operation of your Lennox heat pump.
If your Lennox heat pump is still not heating or cooling effectively, our experienced technicians at One Stop HVAC can provide expert assistance. Contact us for thorough diagnostics and efficient solutions to restore the optimal functionality of your Lennox heat pump.
What should I do if my Lennox heat pump has ice build-up?
Ice Build-up on Inside Evaporator During Cooling:
- Issue: Low refrigerant charge, potentially indicating a refrigerant leak.
- Action: Contact a professional technician to inspect and repair the refrigerant system. They can identify and fix any leaks, recharge the refrigerant, and restore proper functionality.
Ice Build-up on the Condensing Coil During Heating:
- Issue: Malfunctioning defrost cycle.
- Action: If you notice ice on the condensing coil during the heating cycle, it suggests a problem with the defrost cycle. Schedule a service appointment with a professional technician to examine and repair the defrost cycle, ensuring it operates correctly.
Note: It’s crucial not to attempt to manually chip away the ice, as this can cause damage to the unit. Professional diagnosis and repair are essential to address the root cause of the ice build-up.
If you observe ice build-up on your Lennox heat pump, our skilled technicians at One Stop HVAC are ready to provide expert assistance. Contact us for a thorough examination and effective solutions to resolve the ice build-up issue and prevent further damage.
Why is my Lennox heat pump making strange noises?
Whistling Sound from Air Handler:
Cause: Ductwork leak.
Action: Contact an air duct cleaning and repair company to inspect and address any leaks in the ductwork.
Rattling or Clicking Sound from Outdoor Compressor or Air Handler:
Cause: Loose parts or debris in the unit.
Action:
- Turn off the circuit breaker associated with the unit.
- Remove the cover and inspect for loose parts.
- Clear any debris inside, such as sticks, leaves, rocks, or small items.
- Check and tighten bolts and screws.
- If issues persist, contact a professional HVAC technician for further inspection.
Other Noises (Screeching, Thumping, Humming):
Cause: Various potential issues requiring professional assessment.
Action:
- Turn off the system to prevent further damage.
- Contact an HVAC technician for a thorough inspection and necessary repairs.
Note: Attempting DIY fixes for certain noises may cause further damage. Professional evaluation is recommended for accurate diagnosis and appropriate solutions.
If your Lennox heat pump produces unusual noises, our experienced technicians at One Stop HVAC can provide expert inspection and repairs.
How do I identify a faulty Lennox heat pump compressor?
Improper Airflow:
- Symptom: Blowing cold air in heating mode or warm air in cooling mode.
- Explanation: A malfunctioning compressor struggles to circulate refrigerant, resulting in incorrect airflow temperatures.
- Action: If you notice this inconsistency, it may indicate a compressor issue. Contact a professional technician for a thorough inspection.
Refrigerant Leaks:
- Symptom: Puddles near the system, accompanied by a hissing sound from the outdoor unit.
- Explanation: Compressor faults can lead to refrigerant leaks, posing a risk to the system and your health.
- Action: Given the toxic nature of refrigerant, immediate professional assistance is essential to inspect and address potential leaks.
Lack of Power:
- Symptom: Lack of power when attempting to turn on the heat pump, or a loud humming sound without activation.
- Explanation: A non-functioning compressor may be unable to draw the necessary electricity, resulting in power-related issues.
- Action: If you encounter these problems, consult a professional technician to assess the compressor’s functionality and address any electrical issues.
High Utility Bills:
- Symptom: Noticeably increased energy bills.
- Explanation: A faulty compressor can cause other system components to overwork, leading to higher energy consumption.
- Action: If your utility bills rise unexpectedly, it may signal a compressor issue. Schedule a professional inspection to identify and address the underlying problems.
Note: Any suspicion of a faulty compressor in your Lennox heat pump warrants prompt professional attention. Contact One Stop HVAC for expert inspection, diagnosis, and necessary repairs to ensure the optimal performance of your heat pump.
Lennox Garage Heater Repair & Installation
One Stop HVAC offers dependable Lennox garage and unit heater repairs and installations throughout Calgary and the CMR. Our team of professional technicians are available every day, offering emergency repairs for Lennox garage heaters and same-day services for garage heater installations. With years of experience servicing Lennox unit heaters, our team has the ability to perform intricate on-site repairs and custom installation plans that prioritize you and your comfort.
Why won't my Lennox garage heater turn on?
Troubleshooting Steps:
- Power Supply Check: Ensure the heater is properly plugged in and that the circuit breaker or fuse has not tripped. Address any issues with the power supply.
- Thermostat Settings: Verify the thermostat settings to ensure they are set to the desired temperature. If the settings are too low, the heater may not turn on.
- Airflow Obstructions: Check for any obstructions blocking airflow, such as debris or items placed too close to the heater. Clear any hindrances that may impede the heater’s operation.
- Heating Element Issues: If the heater still won’t turn on, the problem might be with the heating element. It’s advisable to contact a professional technician to inspect and address issues with the heating element.
Note: If you are unable to identify and resolve the issue with these basic troubleshooting steps, seeking professional assistance is recommended. Attempting to repair or diagnose complex issues without expertise may lead to further problems.
If your Lennox garage heater is still not turning on, our skilled technicians at One Stop HVAC are ready to provide expert assistance. Contact us for a thorough inspection and efficient resolution of the problem.
Why won't the fan on my Lennox garage heater run?
Troubleshooting Steps:
- Fan Switch Check: Verify the functionality of the fan switch. Ensure it is set to the appropriate setting and is not damaged. If the switch is faulty, it may need replacement.
- Blade Obstruction Inspection: Examine the fan blades for any obstructions that might impede their movement. Clear away any debris or items that could be preventing the blades from spinning freely.
- Fan Motor Continuity Test: Use an ohmmeter to test the fan motor for continuity. If the motor fails this test, it indicates a malfunction, and replacement may be necessary.
Note: If you are not comfortable or experienced in performing these tests, it is advisable to seek the assistance of a professional technician. Attempting to repair or diagnose electrical components without expertise may lead to safety hazards.
If, after these troubleshooting steps, the fan on your Lennox garage heater still won’t run, our skilled technicians at One Stop HVAC are ready to provide expert assistance. Contact us for a thorough inspection and efficient resolution of the fan-related issue.
Why is my Lennox garage heater not producing any heat?
Troubleshooting Steps:
- Check Fan Operation: Ensure that the fan is running as expected. If the fan is not operational, it may affect the heater’s ability to produce heat.
- Inspect Heating Element and Wiring: Check for loose or disconnected wires in the heater. If found, carefully solder them back securely (ensuring the heater is unplugged). Faulty wiring can hinder the heating element’s operation.
- Heating Element Examination: If the fan is running, but the heater is still not producing heat, focus on the heating element. Inspect the element for signs of damage or malfunction.
- Replace Defective Heating Element: If the heating element is defective, replacement may be necessary. Ensure you select a replacement with the same voltage and wattage rating as the original.
Note: It is crucial to exercise caution when dealing with electrical components. If you are uncertain or uncomfortable performing these tasks, seeking the assistance of a professional technician is recommended.
If your Lennox garage heater is still not producing heat after these troubleshooting steps, our skilled technicians at One Stop HVAC are available to provide expert assistance. Contact us for a thorough inspection and efficient resolution of the heating-related issue.
Why does my Lennox garage heater turn on and off rapidly?
Possible Causes and Solutions:
Blocked Airflow:
- Cause: Restricted airflow around the heater.
- Solution: Ensure the heater has sufficient clearance from obstacles such as drapes or furniture. Blocked airflow can cause overheating and trigger rapid cycling.
Control Switch or Thermostat Issues:
- Cause: Malfunctioning control switch or thermostat.
- Solution: If clearing airflow doesn’t resolve the issue, consider replacing the control switch or thermostat. Faulty components can lead to erratic cycling.
Note: If the problem persists or if you are uncertain about replacing electrical components, it’s advisable to seek the assistance of a professional technician. They can perform a thorough inspection and address the specific issues causing the rapid cycling.
If your Lennox garage heater continues to turn on and off rapidly, our experienced technicians at One Stop HVAC can provide expert assistance. Contact us for a detailed inspection and efficient resolution of the cycling-related issue.
Why won't my Lennox garage heater turn off?
Possible Cause and Solution:
Poorly Insulated Garage or Undersized Heater:
Cause: Inadequate insulation or an undersized heater may lead to continuous operation.
Solution:
- Undersized Heater: If the heater is too small for the garage, consider upgrading to a larger capacity heater that can efficiently heat the space.
- Poor Insulation: Improve insulation in the garage to retain heat better, reducing the workload on the heater.
Note: If the issue persists even after addressing insulation or upgrading the heater, it could indicate a problem with the thermostat or control system. In such cases, seeking the assistance of a professional technician is recommended.
If your Lennox garage heater continues to run continuously, and adjusting the insulation or upgrading the heater doesn’t resolve the issue, our skilled technicians at One Stop HVAC can provide expert assistance. Contact us for a thorough inspection and effective solutions.
Why is my Lennox garage heater giving off a burning smell?
If you experience a burning smell from your Lennox garage heater, it is important to seek professional assistance as soon as possible because this could be a fire hazard.
Possible Cause and Solution:
Accumulated Hair or Dust on Heating Element:
Cause: The burning smell is often caused by the accumulation of hair or dust on the heating element.
Solution:
- Safety First: Disconnect the heater from the power source before attempting any maintenance.
- Access Heating Element: Carefully open the heater to access the heating element.
- Thorough Cleaning: Clean the heating element thoroughly, removing any accumulated dust or debris.
- Preventive Measures: Regularly clean the heating element to prevent future build-up and associated odours.
Note: If you are uncomfortable or uncertain about cleaning the heating element, or if the burning smell persists after cleaning, it is strongly recommended to seek the assistance of a professional technician. Persistent odours may indicate other issues that require expert inspection.
If you need professional assistance with your Lennox garage heater emitting a burning smell, our experienced technicians at One Stop HVAC are ready to help. Contact us for a thorough examination and effective solutions to address the burning smell and ensure the safe operation of your garage heater.
Lennox Thermostat Repair & Installation
Lennox offers a variety of smart thermostats and traditional thermostats, these are responsible for controlling the heating and cooling properties of your home. One Stop HVAC offers emergency repairs for Lennox thermostats and same-day appointments for Lennox thermostat installation services. Our team of technicians has years of experience with Lennox appliances, allowing them to not only service your thermostat but also your Lennox HVAC system to ensure the proper functionality of your home’s heating and cooling abilities.
Why won't my Lennox thermostat turn on?
Troubleshooting Steps:
- Power Check: Ensure the power to the thermostat is on. Check your breaker box for any tripped breakers. If a breaker is tripped, reset it to restore power to the thermostat.
- Air Filter Inspection: Change your air filters regularly. Dirty filters can impact the HVAC system’s efficiency and may affect the thermostat’s performance. Replace the filters to ensure proper airflow.
- Thermostat Battery Check: If your thermostat uses batteries, check and replace them if needed. Low or dead batteries can prevent the thermostat from turning on.
- Wiring Inspection: If the thermostat still won’t turn on after checking the power, air filters, and batteries, there may be issues with the wiring. Consider calling an electrician or HVAC technician to inspect and address any wiring problems.
Note: If you are not familiar with electrical work or HVAC systems, it’s recommended to seek professional assistance to avoid safety hazards and ensure proper resolution of the issue.
If your Lennox thermostat is still not turning on after these troubleshooting steps, our skilled technicians at One Stop HVAC are available to provide expert assistance. Contact us for a thorough inspection and efficient resolution of the thermostat-related issue.
Why won't my Lennox thermostat reach the set temperature?
Troubleshooting Steps:
- Thermostat Location Check: Ensure the thermostat is not exposed to direct sunlight, cold air, or other heat sources that may impact its accuracy. Incorrect temperature readings can result from poor thermostat placement.
- Programmed Temperature Verification: Check that the desired temperature is correctly programmed into the thermostat. Verify that the thermostat is set to the appropriate mode (heating or cooling) based on your needs.
- Temperature Sensor Inspection: Ensure the temperature sensor on the thermostat is clear and unobstructed. Dust or debris covering the sensor can affect its accuracy and the thermostat’s ability to reach the set temperature.
- Thermostat Calibration: Some thermostats allow for calibration. Refer to the user manual to see if your thermostat has this feature. Calibration can help align the displayed temperature with the actual room temperature.
If your Lennox thermostat is still not reaching the set temperature after these troubleshooting steps, our experienced technicians at One Stop HVAC can provide expert assistance. Contact us for a detailed examination and effective solutions to address the temperature-related issue.
Why is the room temperature not matching the Lennox thermostat settings?
Troubleshooting Steps:
- Dust Removal from Thermostat: Open the cover of your thermostat and use a soft cloth or canned air to clean any dust inside and around it. Dust accumulation can affect the sensors and lead to inaccurate temperature readings.
- Air Filter Replacement: Change your air filters if they are dusty. Dirty filters can impact airflow and the efficiency of the HVAC system, affecting temperature control.
- Check for Air Leaks: Feel around your home for air leaks, especially near windows and doors. If you detect drafts, use weatherstripping to seal them and improve insulation.
- Inspect Ductwork: If possible, check your ductwork for damage, clogs, or holes at joints. Use a flashlight to inspect the inside of ducts by opening registers. Seal any holes with aluminum foil tape or sealant. If you can’t access ductwork, consider hiring a duct cleaning service.
Note: Inaccurate temperature readings can be caused by various factors, and a professional HVAC inspection may be necessary for a thorough diagnosis.
If your Lennox thermostat continues to display inaccurate temperature readings despite these troubleshooting efforts, our experienced technicians at One Stop HVAC can provide expert assistance. Contact us for a detailed examination and effective solutions to address the temperature-related issue.
Why won't my Lennox iComfort thermostat connect to my smart hub device?
Troubleshooting Steps:
- Wi-Fi Router Reboot: Reboot your Wi-Fi router. Power it off, wait for a few seconds, and then power it back on. Check if other devices in your home can connect to the network.
- iComfort Thermostat Wi-Fi Connection: Ensure your iComfort thermostat is connecting to your intended Wi-Fi network and not another one nearby. Check the thermostat settings to verify the correct Wi-Fi network connection.
- Proximity to Router: Try connecting the iComfort thermostat again, but position the smart hub closer to the router. Distance and obstacles can affect the strength of the Wi-Fi signal.
- Verify Network Credentials: Double-check that you are entering the correct Wi-Fi network name and password when attempting to connect the iComfort thermostat to your smart hub.
Note: Connectivity issues may involve a combination of factors, and professional assistance may be necessary for a thorough diagnosis and resolution.
If your Lennox iComfort thermostat continues to have trouble connecting to your smart hub device despite these troubleshooting efforts, our experienced technicians at One Stop HVAC can provide expert assistance. Contact us for a detailed examination and effective solutions to address the connectivity issue.
Why won't my Lennox iComfort thermostat connect to my HVAC equipment?
Troubleshooting Steps:
- Check Compatibility: Verify on the Lennox website that your HVAC equipment is compatible with the Lennox iComfort thermostat. Currently, the Lennox SLP98V, SL280V, and EL296V furnaces, as well as the CBX40UHV and CBX32MV air handlers, are iComfort-compatible. For other Lennox equipment, an equipment interface module may be required for compatibility.
- Power Cycling: If your equipment is compatible, turn off the electrical breaker to the thermostat and air conditioner. Also, turn off the furnace power. After turning off the breakers, turn the furnace power back on and wait for five minutes.
- Setup Configuration: After power cycling, go to the “setup” tab on the iComfort thermostat and perform the setup configuration again. Follow the manufacturer’s instructions for the setup process.
Note: If the issue persists, or if you are uncertain about the compatibility or setup process, it is advisable to seek the assistance of a professional technician. They can ensure proper compatibility and configuration for optimal functionality.
If your Lennox iComfort thermostat still won’t connect to your HVAC equipment despite these troubleshooting efforts, our experienced technicians at One Stop HVAC can provide expert assistance. Contact us for a thorough examination and effective solutions to address the connectivity issue.
Lennox Air Purifier Repair & Installation
Air purifiers are growing in popularity in Canada, due to the fluctuating climate the general population rely heavily on HVAC equipment to keep their home at a comfortable temperature. Lennox air purifiers ensure that the air circulating your home is clean and free of airborne pollutants. However, if you experience issues with your Lennox air purifier, this could result in dirty are being spread around your property. One Stop HVAC offer emergency repairs for Lennox air purification systems and same-day appointments for Lennox air purifier installations. You can trust our professional technicians to get your Lennox air purifier in top condition!
Why won't my Lennox air purifier turn on?
Troubleshooting Steps:
- Power Cord Check: Ensure that the power cord of the air purifier is properly plugged in. If not, plug it in securely and attempt to turn on the power button.
- Power Outlet Inspection: Check the power outlet to which the air purifier is connected. Ensure that the power outlet is not damaged, and the cord is properly connected. If needed, try using a different power outlet.
- Power Rating Verification: Check the power rating of your air purifier, which is mentioned in the product details and manual. Ensure that the power rating matches the specifications of the power outlet. Using an outlet with an incompatible power rating can hinder the operation or damage the air purifier.
- Cord Condition Check: Inspect the power cord for any damage. If the cord is damaged, do not use the air purifier. Contact the support team of the purifier’s brand for assistance and get the cord repaired or replaced.
If your Lennox air purifier continues to have issues turning on, and the troubleshooting steps do not resolve the problem, seek professional assistance from One Stop HVAC to ensure proper diagnosis and resolution.
Why is my Lennox air purifier overheating?
Possible Causes and Solutions:
Faulty Power Source:
- Cause: Overheating can be caused by a faulty power source or electrical issues.
- Solution: Ensure that the power source, including the outlet and cord, is in good condition. Consider using a different power outlet or checking the wiring for any issues.
Malfunctioning Internal Components:
- Cause: Internal components, such as the motor or fan, may malfunction and generate excess heat.
- Solution: If you suspect malfunctioning internal components, it is recommended to schedule a servicing appointment with a professional technician. They can inspect and repair any issues with the internal components.
Filter Obstruction:
- Cause: A clogged or obstructed air filter can reduce airflow, leading to overheating.
- Solution: Check the air filter for any obstructions or dirt. If the filter is dirty, clean or replace it according to the manufacturer’s instructions.
Built-in Security Measure:
- Cause: Some air purifier models have a built-in security measure to prevent overheating, which may trigger if the purifier runs excessively or becomes too hot.
- Solution: If the overheating is due to a built-in security measure, it is advisable to schedule a servicing appointment to address any underlying issues that may have triggered the safety feature.
Note: Overheating issues with an air purifier should be addressed promptly to prevent potential damage and ensure the efficient operation of the appliance.
If your Lennox air purifier is experiencing overheating issues, and the troubleshooting steps do not resolve the problem, contact One Stop HVAC for further assistance.
Why are my Lennox air purifier controls unresponsive?
Troubleshooting Steps:
- Power Cord Check: Ensure the power cord of the air purifier is securely plugged into the outlet. If not, plug it in properly and attempt to use the purifier again.
- Filter Cover Placement: Check the filter cover for proper placement. If it is improperly positioned, follow the instructions in the manufacturer’s guide to correctly place the filter cover.
- Malfunctioning Controls: If the controls remain unresponsive and there are no issues with the power cord or filter cover, it may indicate a malfunction in the control system.
If your Lennox air purifier controls remain unresponsive despite these troubleshooting efforts, contact One Stop HVAC for expert assistance in diagnosing and resolving the issue.
Why is my Lennox air purifier making strange noises while running?
Troubleshooting Steps:
- Check Air Filter Installation: Ensure the air filter is correctly installed and fits the cover properly. An incorrectly installed filter can cause unusual noises. Additionally, inspect the filter for dirt or damage. If the filter is dirty or damaged, replace it with a new one following the manufacturer’s guidelines.
- Inspect for Foreign Objects: If the strange noises persist and there is no issue with the filter, there may be a foreign object inside the air purifier. Do not attempt to open the appliance yourself. Instead, contact the One Stop HVAC support team or an expert for professional assistance.
Note: Unusual noises from the air purifier may indicate issues that require careful inspection. It is recommended to seek professional assistance to prevent further damage and ensure optimal performance.
If your Lennox air purifier continues to make strange noises despite these troubleshooting efforts, contact One Stop HVAC for expert assistance in diagnosing and resolving the issue.
Why is there a strange smell coming from my Lennox air purifier?
Troubleshooting Steps:
- Ventilation and Odor Source: If you detect a strange smell, open doors and windows for ventilation for about an hour while keeping them closed when using the air purifier. Identify and address sources of odours inside or outside the house, such as smoke or cooking smells.
- Kitchen Ventilation: Install a vent or exhaust in the kitchen to eliminate cooking smells, preventing them from affecting the air purifier’s performance. Adequate kitchen ventilation contributes to maintaining a fresh indoor environment.
- Deodorizing Air Filter: Some air purifiers use deodorizing air filters with materials like activated carbon, which might produce a temporary unusual smell. Use original filters from trusted sellers when replacing them to avoid unexpected odours.
If your Lennox air purifier continues to produce a strange smell despite these troubleshooting efforts, professional assistance may be required to identify and address the issue effectively. Contact One Stop HVAC for expert guidance and support.
Lennox Humidifier Repair & Installation
One Stop HVAC offers professional repair and installation services for Lennox humidifiers, our team has extensive experience performing intricate on-site repairs and customized Lennox humidifier installation plans that prioritize you. We offer emergency repairs and same-day appointments for your Lennox humidifier, ensuring that you never have to go without!
Why won't my Lennox humidifier turn on?
Troubleshooting Steps:
- Check Water Level: Ensure that the water tank of the humidifier has an adequate level of water. A low water level can prevent the humidifier from turning on.
- Inspect for Clogging: Check for any signs of clogging inside the humidifier. Clogging can occur due to hard water build-up, leading to mineral deposits. Use distilled water or mineral water to prevent such build-up.
If the humidifier still doesn’t turn on after checking the water level and addressing potential clogging, it is advisable to contact One Stop HVAC for professional assistance.
Why won't the drum in my Lennox humidifier turn?
Troubleshooting Steps:
Humidifier Drive Motor:
- Check Power from Humidistat: Ensure that the drive motor is receiving power from the humidistat. If not, verify the humidistat’s functionality and wiring.
- Inspect Motor Strength: If the motor is working but lacks the strength to turn the drum, consider replacing the drive motor. If the motor clicks or only partially spins the drum, replacement may be necessary.
Humidifier Control Board:
- Power Verification: Confirm that the humidifier is receiving power from the furnace control board. If there’s no power, and the furnace control board is determined to be faulty, consider replacing it.
Humidifier Transformer:
- Check Voltage Supply: Some furnaces have a separate transformer for the humidifier. Verify that the humidifier is receiving the proper voltage. If the transformer has failed, even with functioning humidistat contacts, replacement may be required.
If the Lennox humidifier drum still refuses to turn after checking these components, it is recommended to contact One Stop HVAC for professional assistance. Our technicians can accurately diagnose the issue and provide the necessary repairs or replacements for optimal humidifier performance.
Why is my Lennox humidifier overflowing?
Troubleshooting Steps:
Lennox Humidifier Drain Hose:
- Check for Kinks or Clogs: Ensure the drain hose is not kinked between the humidifier and the drain source. If not, check for any clogs. Unclog the drain hose by removing it from the drain pan and using compressed air to clear obstructions.
Lennox Humidifier Water Panel Distribution Tray:
- Inspect for Clogs or Damage: On flow-through style humidifiers, examine the water panel distribution tray for mineral deposits or damage. If clogged or damaged, incoming water may overflow. Replace the water panel distribution tray if necessary.
Lennox Humidifier Filter Holder:
- Check for Obstructions or Damage: For some flow-through style humidifiers, inspect the filter holder for mineral deposits or damage. If clogged or damaged, water overflow may occur. Replace the filter holder if needed.
Lennox Humidifier Water Evaporator Pad:
- Inspect for Clogs: In flow-through style humidifiers, check the water evaporator pad for clogs caused by mineral deposits. If clogged, water may ride along the top and overflow. Replace the water evaporator pad if water does not exit properly.
If the Lennox humidifier continues to overflow despite these checks, it’s advisable to contact One Stop HVAC for professional assistance. Our technicians can thoroughly assess the humidifier and implement the necessary repairs or replacements to prevent overflow issues.
Why is my Lennox humidifier not draining properly?
Troubleshooting Steps:
Lennox Humidifier Drain Hose:
- Check for Kinks or Clogs: Ensure the drain hose is not kinked between the humidifier and the drain source. If not, inspect for any clogs. Unclog the drain hose by removing it from the drain pan and using compressed air to clear obstructions.
Lennox Humidifier Drain Pan:
- Clear Drain Outlet: If the outlet of the humidifier drain pan is clogged with mineral deposits, remove the front panel or housing to access the drain outlet. Gently clear deposits using a small Flathead screwdriver. In some cases, remove the pan from the unit for thorough cleaning.
Lennox Humidifier Water Evaporator Pad:
- Check for Clogs: Examine the water evaporator pad for clogs caused by calcium and mineral deposits. If clogged, water may not exit properly, leading to drainage issues. Replace the water evaporator pad as needed.
Lennox Humidifier Water Line:
- Inspect for Leaks and Damage: Check for loose or corroded fittings at the water inlet valve or float. Inspect the water line from the water inlet valve to the water evaporator pad (if applicable) for signs of leaks, cracks, or brittleness. Replace damaged water lines.
If the Lennox humidifier still experiences drainage problems after these checks, contact One Stop HVAC for professional assistance. Our technicians can conduct a thorough assessment and implement the necessary repairs or replacements to ensure proper drainage.
Why is my Lennox humidifier not pulling enough water?
Troubleshooting Steps:
Lennox Humidifier Water Inlet Valve:
- Test for Continuity: Use a multimeter to test the water inlet valve for continuity. If there’s no continuity, replace the valve. Check for incoming power to the valve. If it has continuity and power but is still not filling with water, the valve may be clogged. Replace a clogged water inlet valve.
Lennox Humidifier Humidistat:
- Check Settings and Functionality: Ensure the humidistat is correctly set. Turn it to the highest setting and listen for a click, indicating the electrical contacts inside are closing. If no click is heard, the humidistat may be defective. If a click is heard but the humidifier still doesn’t fill with water, another part may be faulty.
Lennox Humidifier Float:
- Inspect for Obstructions or Damage: In a drum-style humidifier, the float regulates water entry. If the float is damaged or obstructed, it may prevent the inlet valve from opening. Inspect the float for any issues and replace it if necessary.
If the Lennox humidifier continues to struggle with water intake after these checks, it’s recommended to contact One Stop HVAC for professional assistance. Our technicians can assess the humidifier and address any underlying issues affecting water flow.
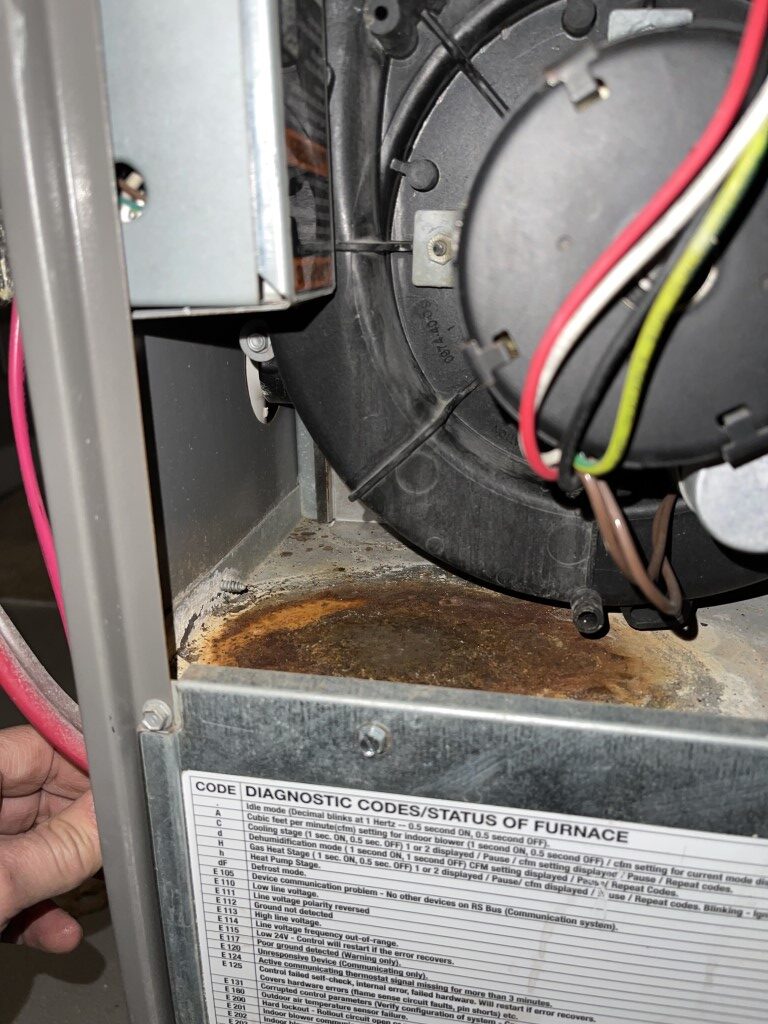
Lennox Furnace Error Codes
E215: Blower Motor Not Communicating
This indicates an issue with the blower motor communication, possibly caused by a faulty motor or control board.
E223: Flame Rollout Switch Closed
Suggests a potential issue with the flame rollout switch, which could lead to unsafe conditions.
E224: Ignition Control Circuit Failure
Points to a problem with the ignition control circuit, which controls the ignition sequence.
E225: Ignition Failure
Indicates a problem with the ignition system, such as a faulty igniter or gas valve.
E228: Flame Sensor Signal Weak
Weak or intermittent flame signal detected, possibly due to a dirty or faulty flame sensor.
E229: Flame Sensor Failure
Indicates a problem with the flame sensor, which detects the presence of a flame in the furnace.
E233: Limit Circuit Fault
Indicates a problem with the limit circuit, which is responsible for monitoring the furnace’s temperature and ensuring safe operation.
E256: Low Flame Signal
Indicates a low flame signal, which may be caused by an insufficient gas supply, a dirty burner, or a faulty gas valve.
E270: High-Pressure Switch Open
Indicates a high-pressure issue in the furnace, potentially caused by restricted airflow or a blocked vent.
E292: Communication Failure
Suggests a problem with communication between the control board and other components of the furnace.
Please note that these error codes are general and may not cover every possible variation. Always refer to your Lennox furnace manual or consult a professional technician for accurate diagnosis and resolution.
Lennox Air Conditioner Error Codes
E1: High-Pressure Protection
Indicates that the high-pressure safety switch has been triggered due to excessive pressure in the refrigerant system.
E2: Low-Pressure Protection
Indicates that the low-pressure safety switch has been triggered due to insufficient pressure in the refrigerant system.
E4: High-Temperature Protection
Points to the AC unit shutting down due to excessively high temperatures.
E5: Low-Temperature Protection
Suggests the AC unit has shut down due to excessively low temperatures, which can happen during very cold weather.
E6: Communication Error
Indicates a communication problem between the indoor and outdoor units or between the control board and other components.
E7: Indoor Fan Motor Error
This points to an issue with the indoor fan motor, which may result in poor airflow.
E8: Outdoor Fan Motor Error
This suggests a problem with the outdoor fan motor, potentially causing improper heat dissipation.
E9: Open or Short Circuit of Room Temperature Sensor
Indicates a problem with the room temperature sensor, affecting accurate temperature readings.
E10: Open or Short Circuit of Evaporator Temperature Sensor
This points to a problem with the evaporator temperature sensor, affecting the AC’s cooling performance.
E11: Open or Short Circuit of Condenser Temperature Sensor
Suggests a problem with the condenser temperature sensor, impacting the AC’s efficiency.
Please note that these error codes are general and may not cover every possible variation. Always refer to your Lennox AC manual or consult a professional technician for accurate diagnosis and resolution.